Archive for the ‘stained woods’ category
« Stained Woods: Art by Tina Hanagan, Bloomington, IN
home page
April 13, 2009
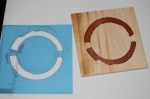
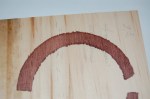
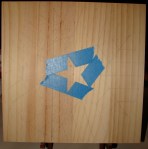
It’s time for the circles. I’ve had a love/hate relationship with them over the years. No matter how hard I try, I can’t get the masking tape to form a circle. Doing them free hand just doesn’t leave the nice, crisp edge that I like.
I’ve tried many different ways to get them right. The latest attempt was using a stencil film to cut out the circle, then with some Krylon Easy-Tack set it on the wood and stained away. Circle fail! Or, maybe it’s stencil fail. As, you can see.
I know, I didn’t manage to cut the stencil film very well, but I still don’t think that would have helped the process. Doese anyone have any ideas? I’m going to try one more idea, but I don’t really think it will work. So, does anyone out there have any inspiration to share? Please, let me know.
Categories: rolling ball sculpture, stained woods
Tags: circle, easy-tack, krylon, stained wood, stencil
Comments: 4 Comments
April 8, 2009

Transfer paper is a good thing.
Yes, there’s been some activity on the rolling ball sculpture base! I have a lovely piece of maple that I spent what seems like years sanding. (And, I STILL might have to do more!) I even worked on a bit of extra maple for stain samples, but didn’t finish it because I couldn’t wait to get started on the real thing. I had a heck of a time transferring the drawing to the actual wood. The reason, I finally discovered was that I had altered a couple of angles while working on the pine mock-up. And, since that piece wasn’t large enough for the design in the first place, I was rather confused last night.

Stain: Antique Maple

Stains: Chestnut and Brazilian Rosewood
Things are looking better.
Categories: art, rolling ball sculpture, stained woods
Tags: art, maple, RBS, rolling ball sculpture, stained wood
Comments: 2 Comments
January 8, 2009
Pics of the front both in progress and the finished look.

Just the penciled lines of the design. Yes, I use tracing paper!

Working on the design

Almost all of the design has been stained.

The design is mostly done, and I've started the base color.

No more design to work on. Just the base.

The front is almost done. I did the sides and past the purfling at the same time.

There's the front!
Here’s a link or two that might be interesting:
About the purfling
Inlaying the purfling — a video
Categories: musical instruments, stained woods
Tags: art, handmade, violin
Comments: Be the first to comment
January 6, 2009
My first musical instrument project was a violin made by my Uncle Gene. He had decided to quite making them, but was kind enough to add one more to the list. He even sent along a book called Violin Making to help and inspire. I remember being terrified that I would ruin his beautiful craftsmanship with my crazy stain designs. I went through many design ideas before I settled on something that I thought would work. (I’d still like to make something based on the f-hole, maybe next time.) 
Here’s a couple of pics before I did too much damage:


Categories: musical instruments, stained woods
Tags: art, handmade, violin
Comments: Be the first to comment
December 28, 2008
Yes, it’s true. I got a bunch of wood-type stuff for the holidays. My husband picked up some of my more standard supplies. And, my brother was kind enough to get me some new hardwoods — some of which I’ve never even heard of before. Including panga panga, jatoba, purpleheart wood and one of my more normal favorites, maple. I can’t wait to see how the stains look on the new wood!


I think my socks match the purpleheart wood!

Categories: stained woods
Tags: hardwood, jatoba, maple, panga panga, purpleheart wood
Comments: 1 Comment
December 16, 2008
Yes, it’s true. I’ve managed to finish some ornaments over a week before Christmas. I’m not sure how, but I do know that I haven’t baked anything, yet. So, here’s what they look like after several coats of high gloss tung oil finish.


Categories: stained woods
Tags: art, Christmas, craft, hand made, holiday, ornaments, stained wood
Comments: 3 Comments
December 11, 2008
I had to put away my trivets for a little bit. I realized that my next idea was on a time crunch. Ornaments!! I found some little tag-shaped craft wood. (Yes, I spend a decent amount of time at Michael’s.) A few round ones, and am turning them into stained wood ornaments. So far, I like them, and think they have great potential. This seems like a natural holiday project. Perhaps an annual one? Maybe I should just give them as gifts?

The work table

A little one on a sanding block

With a ruler for scale
I guess I should get back to work. Only a few are out of the stain phase. Tick, tock!
Categories: stained woods
Tags: art, Christmas, craft wood, gift, holiday, ornaments, stained wood
Comments: 2 Comments
December 7, 2008
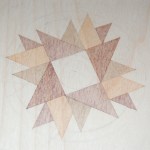
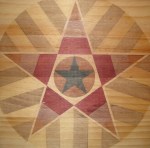
I’m not sure why I’ve decided to work on a bunch of different trivets at one time, but that’s what I seem to be doing. New designs and new sizes. More complex than ever before. It’s exhausting.
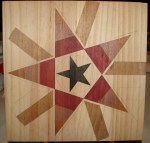
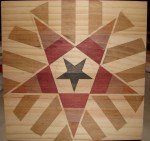
In the past the trivets have been 9 1/2″ squares of pine that I stain and finish with polyurethane. Many, many coats of polyurethane. It works great. I’ve been known to take things straight out of the oven and onto the trivet without any problems. Now, I’m trying out some 6″ squares. I think they will work out nicely. I’m working on several different pieces right now, including a better version of the DC Star — both large and small.


That’s actually the smaller DC star, and a comparison of the two sizes with another pattern. I guess I should look up what that one is called, huh? Any ideas?
Categories: stained woods
Tags: art, pine, polyurethane, stained wood, trivet
Comments: Be the first to comment
November 13, 2008
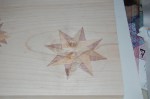
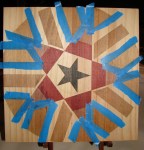
I think I’m getting this one worked out.
I worked on a sample version on a warped pine trivet that I had lying around. I snapped a few pics to show the process if anyone is interested. I’ve already changed my mind, and it no longer fits on the 9 inch square that I was using. I added a line outside the big star, and it looks like I’ll need to reduce the size.
I purchased a new circle cutter, and was pleased to find out that it seems to work well for painter’s tape! I’m looking forward to doing an offiical version. Yes, I have a few more changes in mind.
Categories: stained woods
Tags: art, DC, pine, stained wood, trivet
Comments: 4 Comments